The Sierra Shift: Snow Traction.
Changing Gear for a High Snow Sierra on the Pacific Crest Trail
On a high snow year like 2011 or 2017, Pacific Crest Trail hikers face a huge shift in gear, food, and strategy when they hit Kennedy Meadows just after mile 700. Soon, the trail reaches 10,000 feet and beyond. Snow appears, temps drop, and resupply/escape options thin out.
In other words; you need to be prepared.
Here's how my snow gear shifted as I moved into the Sierra on May 12th, 2017. I did some things right, I did some things wrong. Learn from my experience and mistakes and you'll be warm, dry, and fed through some of the most challenging and rewarding sections on the Pacific Crest Trail in the early season.
Snow Traction
The fun stuff.
Most of the questions I get concerning gear in the early season revolve around what I chose when it came to staying safe on the slippery, hard ice and snow in the Sierra backcountry. There's much debate concerning microspikes vs. crampons, snowshoes vs. no snowshoes, ice axe vs. Whippet etc. etc.
I went through the Sierra between May 12th and June 15th in a very high snow year. Conditions (and therefore: gear) change drastically as that window moves further into the summer. To be clear:
There were little to no footprints to follow for the 460 miles I was walking through snow. I wasn't stepping into hard-packed footprints, I was walking across blank sheets of ice and snow.
Because I was early in the Sierra, about 80% of what I was walking across was consolidated snow or hard ice. This is a benefit of the early season (April/May).
Time of day has a lot to do with snow conditions. I woke up most mornings at 2 or 3 a.m. and stopped hiking by noon. Had I hiked during more normal hours, my 80% hard snow would've dropped closer to 50%.
For the conditions I was hiking through, this is what I brought with me:
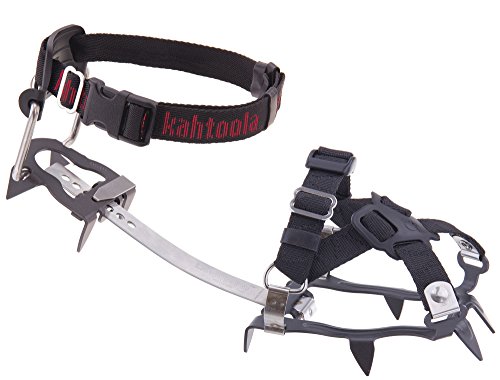
Crampons

Good for much more than just collecting pine cones.
Before crampons, I was a staunch supporter of microspikes. To be honest though, I'd never used crampons. So my fear of the unknown made me cling to microspikes regardless of the conditions. But after being one of the first hikers in 2017 to slowly and sketchily traverse across Taquitz Peak, Fuller Ridge, and then Baden Powell... I figured out a valuable lesson:

There are only two conditions where microspikes are ideal:
There's bullet-hard ice to walk on.
There's already footprints to step into.
I had neither of those two luxuries, so I shifted into crampons and I can honestly say: I'll never use my microspikes again, weight penalty be damned. The difference is that incredible.
I used the Black Diamond Contact and they were unbelievable. I'd recommend them 1,000 times over. Sturdy, durable, and large spikes to grip more easily in softening snow.
The cons are far outweighed by the pros, but here's the few downsides:
Heavy. There's lighter options out there in crampon-land (but none that will perform as well).
Front points. Mainly used for vertical ice climbing, they've been known to rip pants or even stab calves with a careless step. I had a few rips from my front points, but no injuries. The front points aren't entirely useless for hiking though. They make kicking steps in hard snow effortless, even without stiff, clunky boots on. Going slow enough to stay controlled with your steps fixes this issue.
Flex Bars. The connection between the front group of points and the back is a metal bar with some flex in it. This allows the crampons to flex along with the footwear, BUT a relentless guarantee of any metal is that with enough bending, it'll break. Stiffer boots give those bars a longer life, more flexible footgear (trail-runners, especially) give those bars a shorter life. Carry an extra (or two) with you to mitigate the problem.

There are other popular crampons people use. Many go with the Kahtoola K-10's or KTS crampons. I walked into Eastside Sports in Bishop 100% ready to buy K-10's... until I actually had them in my hands.
Lots of plastic buckles and straps... too many rivets and fabrication points... shallow spikes (but still longer than microspikes)... they just felt like a fragile toy compared to the Black Diamond Contacts next to them. So I walked out of the store with Contacts. This isn't to say Kahtoola's crampons won't do the trick... but if your snow traction were to break out in the early Sierra, you'd be in a very rough spot.
That being said, I don't have experience with them and many hikers have used them successfully. Go check them all out for yourself!

Snowshoes

The Tubbs Flex ALP training with me in the Sierra - February 2017.
One of the pieces of gear I was most apprehensive to bring into the Sierra was snowshoes. I can't count how many times I'd been told I'd regret it, that they'd be dead weight, that snowshoes were impractical for the Pacific Crest Trail...
Wrong, wrong, wrong.
First, let me clarify, I do NOT recommend snowshoes unless there’s been a big winter. If there’s not 80% or heavier snow coverage—snowshoes aren’t worth the weight. You need them on your feet most of the time, not on your back. In 2017, the coverage between Kennedy Meadows and Sonora Pass was 90 or 95%, so it made sense.
Second, there are two VERY different styles of snowshoes out there.
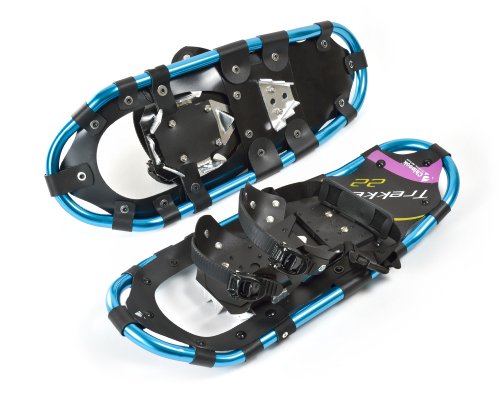
Powder, non-technical snowshoes. These are used for romping around in deep powder on snow that's at little-to-no angle. They tend to be lined with aluminum tubing, have very few metal points on the underside (usually only a few small points on the underside of the foot) and will run you well under $200.
These are NOT what I'm talking about when I speak highly of snowshoes. Quite the opposite, I'd rather go into the backcountry with ballet slippers. Here's an example of these snowshoes you wouldn't bring into the Sierra:
2. Alpine, technical snowshoes.
These are the snowshoes to bring with you into the early season Sierra. The main difference: the underside is covered in crampon points, too many to count. Well, at least not if I'm set on using my time wisely.

Look at all them points!
Alpine snowshoes are a tool of the early season, I wouldn't take them into the backcountry once there is a beat-in path of footprints in the snow (which is usually early-to-mid June). Crampons or even microspikes will do the trick then. You 100% can make it through the Sierra in any kind of snow year with just crampons in the early season (Late April/May), but I fell in love with snowshoes. I look at alpine-style snowshoes as super-crampons, like the difference between chopping wood with an axe or chopping wood with a hydraulic wood splitter...
Both will get the job done. One will get the job done easier.
Think of snowshoes on early season snow as a more stable, more user-friendly traction device. They're covered in crampon teeth along the underside and have a wide platform to stand on. That means less likely ankle-rolls on uneven, slippery surfaces with heavy packs on, MORE traction points to fight slipping, and possibly the biggest pro: you face the slope when hiking steeply uphill, like walking up a flight of stairs (unlike crampons, where you face sideways or even downhill, looking toward the exposure).
There's even more pros I could go on about, but I'll just make it clear: alpine-style snowshoes aren't something to dismiss.
Keep in mind, there's quite the gamut between the two styles of snowshoes I described. Typically, you get what you pay for. I saw many pairs of $150 MSR Lightening Ascents out there, but side-by-side with my $250 snowshoes, they took much longer to strap on and definitely didn't grab as hard into the steep snow.
I promise you that on Mather Pass in the sun, you'll be cursing your own name for that $100 you saved...
Here's what I used, the Tubbs Flex ALP 24:

Ice Axe

My partner through the High Sierra, Amped, yielding the Camp Corsa Nanotech.
This was an easy choice. Although pricey, there aren't any ice axes that come close to the Camp Corsa Nanotech in terms of lightweight, dependable self-arrest. You can save money with other axes, but you'll pay the weight penalty. For an item that spends 95% of its time on your back, go with as light as possible.

The Whippet (made by Black Diamond) is a semi-popular choice for early season hikers. It's essentially the head of an ice axe that's mounted onto the top of one of your trekking poles ... but it's a good idea that doesn't quite pan out in the reality of early season PCT hiking.
A big part of early season PCT hikes is crossing swollen creeks. What do you need when crossing creeks? Trekking poles. What is the first thing you lose if you slip and go into a creek? Trekking poles.
If your self-arrest device is mounted to a trekking pole, you take a big hit if you lose them. This actually happened to a hiker Amped and I joined up with right before Bear Creek. I immediately appreciated having my trekking poles and self-arrest device separated from one another.
The Nanotech comes in a few different lengths, I used the 60 cm version. Amped used the 70 cm version. Both worked just fine. A longer axe is easier to use for stability moving up a steep slope, but you also pay the weight penalty... so the length is really just up to personal preference. Just remember: axes stay on your back 95% of the time.
Boots

Specifically, my shift from trail-runners in the desert to boots in the Sierra. Real quick: many die-hard trail-runner enthusiasts (myself included) refuse to believe that boots could be the right answer. They're SO heavy, clunky, and hard to dry out, right? Definitely. You're super right.
But there's major benefits to boots that more than make up for their downfalls.
Stiffer soles means less repeated bending of the crampon flex-bars, therefore more miles until those bars snap.
Easier kicking steps and edging in snow (the bright side to wearing something heavy and clunky).
More ankle support for the guaranteed-heavier load you'll be carrying. A rolled ankle can quickly become a broken ankle with a 40 pound pack on your back.
Trail runners have two main benefits:
Dry easily
Light weight
So if you don't go with trail-runners, how are you ever going to dry your footwear out?? I'm going to break everyone's heart and deliver some bad news: In spring snow travel, your feet are going to be wet, always.
Boots or trail-runners, waterproof or super-ventilated, GTX or not, special socks or not, prayer-beads or not.
Wet, wet, wet. All of it.
So basically, moisture management shouldn't be considered in this equation, however counter-intuitive that may seem. Anything you choose will be wet. But on the bright side, a fire each night is a great way to relax and spend some time drying your feet and your shoes.
So without considering the quick-drying benefit, lets address willingly strapping two bricks onto your feet.
Less weight on your feet is great while you're strolling across flat, easy snow, but the light, malleable nature of trail-runners rapidly becomes a negative when you have to kick steps with your frozen toes or snap your fourth flex-bar and have to walk through steep snow with only one crampon.
But really, what kind of chump would be that unlucky? *sheepishly raises hand*

Trail-runners and crampons have an oil-and-watery kind of relationship...

I ended up switching back into trail-runners in South Lake Tahoe because I was starting to see more and more dry trail. I don't regret that decision, but I definitely went through a few flex bars. Carry extras! I found I'd get about 200 miles per flex bar in trail runners. I've never actually broken a flex bar wearing boots.
The boots I used were Salomon's Snowtrip series. They were great boots, but they aren't made anymore. I thoroughly destroyed my Salomon's on my thru-hike (they were almost 10 years old!), so I tossed them when I got home and replaced them with Salomon's updated version, the Toundra's: